WWW.SKULLFORGESCENICS.ETSY.COM

Wednesday, January 30, 2013

Drippy Brushes? Try This!

I've been painting so much terrain recently, I figured I would take a moment to talk about some of the tools I use and a few solutions I've found to make life easier.


My painting technique consists of mainly drybrushing and washing. I'll brush up a color, then apply a wash to soften the tones, and repeat until I'm satisfied with the result. It's an organic process. The brushes I use are pretty cheap. You can get these from Home Depot for a buck or two a piece.


I don't spend a lot of mony on my scenery brushes because I treat them like crap. They'll sit in my water cup for hours before being washed in the sink.


The ferrules on these brushes have a large gap at the top that lets water inside the ferrule. So after I wash the brushes and dry them, they are often still waterlogged inside, and it will drip out of the top of the ferrule at the most inopportune times (usually on the carpet as I carry my "cleaned and dried" brushes back from the sink).


This has plagued me for longer than I can remember, and I finally did something about it. By applying a bead of hot glue along the ferrule seam I was able to seal it and keep the water out. No more drippy brushes!


Another essential tool is a drop cloth. Rather than spend real money on an actual drop cloth or tarp, I picked up a few plastic tablecloths at the dollar store. They're dirt cheap and completely disposable, but they keep those drybrushing speckles off the furniture.


This is just from painting the black on the sides of one small display board:


That's it for this week. In the meantime, check out the new detail shots of the Wild West Exodus buildings that I've added to the terrain gallery.


'Til next time!

Wednesday, January 23, 2013

WWX Terrain: A look Inside, Part 2

Building Construction


After nailing down the concept art, all of the buildings were blocked out with foam core. You can see that the smaller houses on the outskirts were originally much taller. After the main buildings were fleshed out, the houses were just dominating too much space, so I cut them down a little.


From this foam core framework, all the buildings were covered with a combination of basswood strips and panels, popsicle stick planks, and styrene strips.


Saloon


Here's a before-and-after comparison of the saloon from a few different angles:


A couple buildings like the saloon, hotel, jail, and iron horse stables were built with detailed, accessible interiors. Rare earth magnets were added to the attachment points to keep the buildings together.


The roof lifts off, for a nice view of the stairwell and balcony.


The saloon was built with a doubled floor so it could be used for miniature photography with camera angles facing either the stairs or the doors.  The way that it opens up makes me think of it as a gamer's version of a Polly Pocket dollhouse!


The neon sign is 16-gauge floral wire, bent into shape. The support is made from styrene I-beams. I plan to revisit the neon lights with a painting tutorial in a future post.


The shingles on the roof are panels that I sculpted and resin-cast.


The lights are the top halves of metal model railroad lampposts. The domes of the lights are plastic beads, super glued in place.


The bottom halves of the lamp posts were repurposed into the red lights on the porch. The milk can is made from the tip of a marker, with a plastic hole punch glued on top for the lid. The same beads used for the lights were pinned to the top of the railings.


The saloon doors are on working hinges, and swing open.


The other doors are built from basswood strips with rivet-punched styrene kick plates. The doorknobs are sculpted and resin cast. For the other buildings, I created complete doors and resin cast copies.


All of the windows are plastic model railroad windows. Each was fit into the wall, and styrene framing and sills were added to the interior. Only the open buildings got the full window treatment. The others have the windows glues over the blacked-out foam core.


Jail


You never know when a jailbreak scenario might be in order, so I build the jail with a complete interior. The walls are covered with Elmer's Wood Filler putty, and sanded smooth. This creates a nice, pockmarked surface that resembles an adobe building


There are two cells, with bars made from thick floral wire pushed through styrene strips with basswood at the top and bottom.


It might be difficult to see in the photo, but that's a tiny space heater outside the cells.
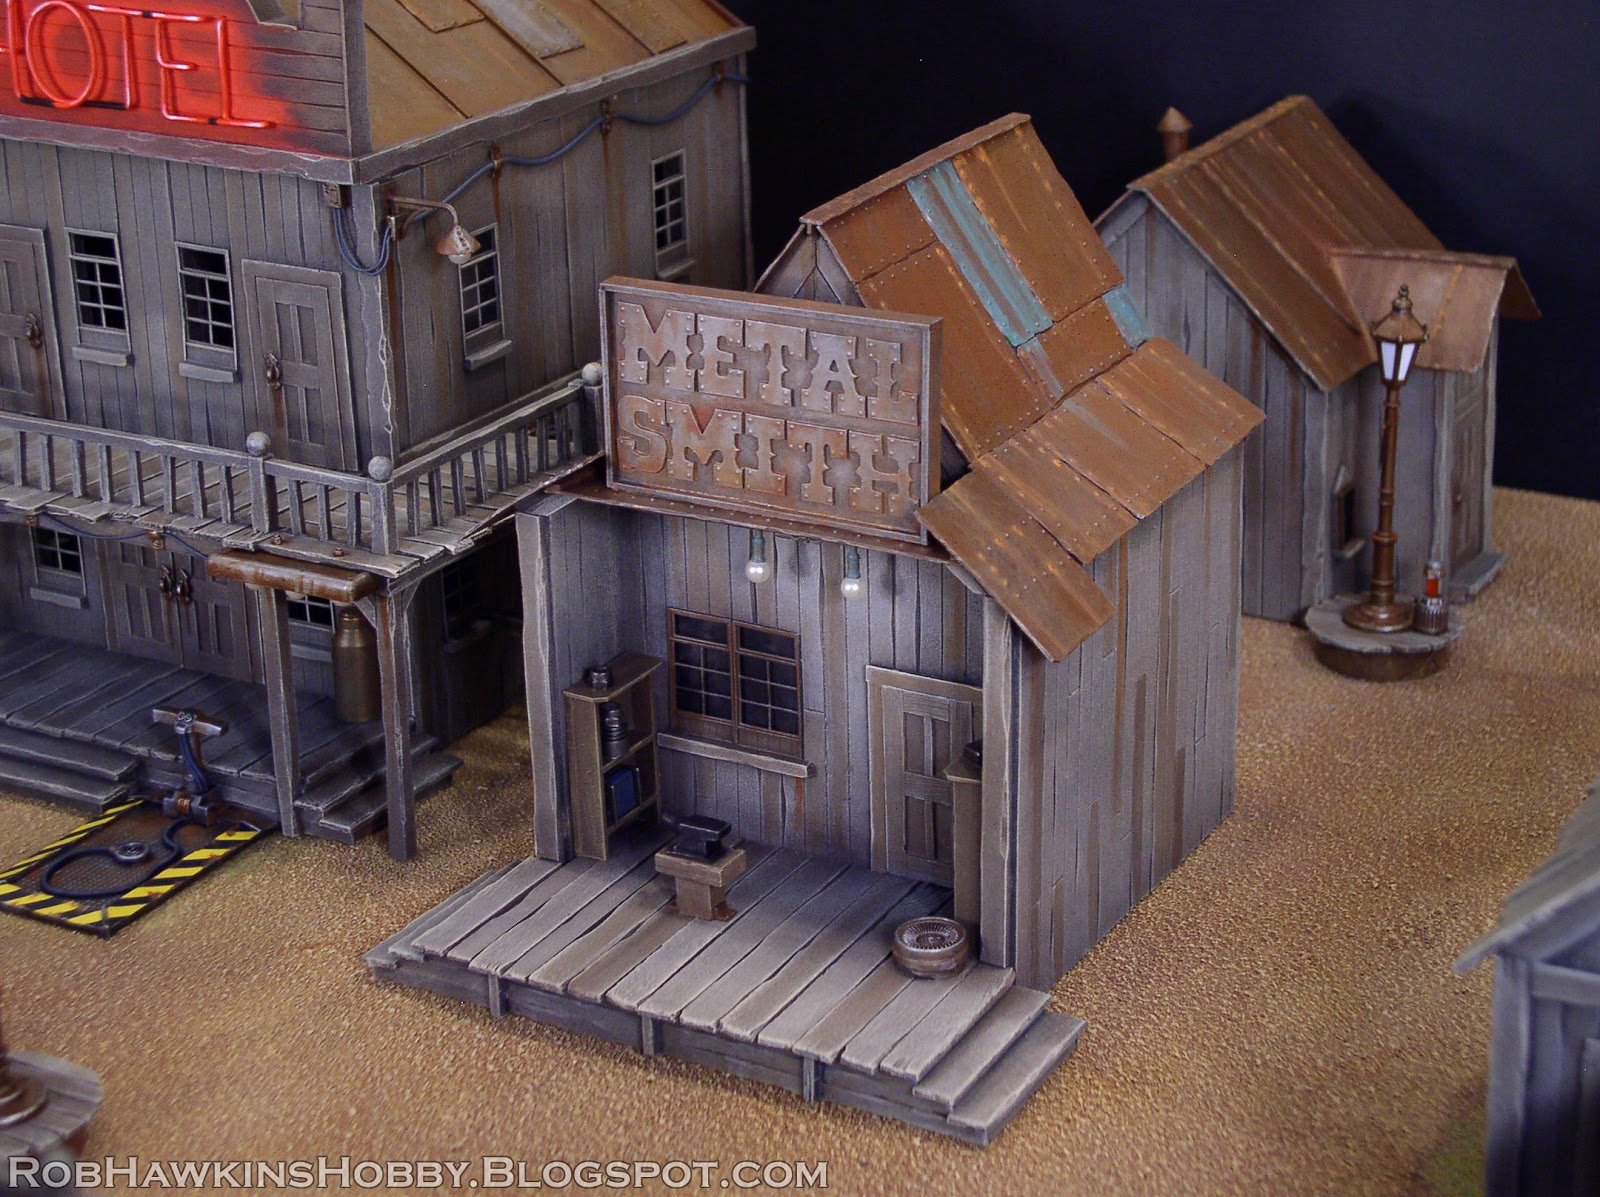


Hotel


The hotel features the mass-produced doors I mentioned earlier, and some neon signs. The chimneys on the roof are resin cast, and the conical chimney top was used to make the lamp over the balcony.


The roof lifts off and the floors stack atop one another.


The floors and walls were painted before gluing the T-shaped insert into place.


Iron Horse Stables 


Most of the tech for this building is on the inside. It's an old horse stable that's been converted into a bike workshop.


The shingles are the same resin cast panels that I used on the saloon.


The shelves were made from sheet styrens and resin cast. I used them for the front of the metalsmith's shop, as well. All of the parts on the shelves were extra bits that I had left over from the generator construction. The cables on the floor are from the iron horse tethers, cast separately and glued in place prior to painting.


I hope you've enjoyed this look inside the buildings of the Wild West Exodus table. I'll be adding detail shots of all the buildings to my terrain gallery as I get them processed. Keep an eye on the gallery updates to see when they're added. If you follow me on Twitter or Facebook, I'll be announcing the updates there, as well.


'Til next time!

Wednesday, January 16, 2013

WWX Terrain: A Look Inside, Part 1

There are only 16 days until the Wild West Exodus Kickstarter goes live. Definitely looking forward to this game!


I'm in the process of adding new pictures of the table and buildings to my terrain gallery. This week, I'll go into some of the details of how the terrain was made. 


Table Layout


The initial plan was to have each building plug into the table, but as the project progressed, I found that to be too limiting. It would have locked the table into a static layout, leaving open holes if any buildings were left off. Instead, I went with an open table with rocky mesas on the ends and a few fixed platforms. Elements like the train station, small house, and gallows were magnetized to the base, but left removable.


The mesas were formed by layering pink insulation foam and using a snap-off knife to make multiple horizontal cuts into the surface. When picked apart, these formed a stepped rockface. 


The sand and rocks were basecoated with latex paint, a color similar to P3 Bloodstone. Then the rocks were stained with brown inks and washes to fill in the recesses, and everything was drybrushed up with colors similar to P3 Moldy Ochre, and GW Bleached Bone.


Woodland Scenics tree armatures were cut up to use as dead trees.


I kept the static grass to a minimum, and added a few scrub bushes using clump foliage. The grass and bushes were drybrushed with a little P3 'Jack Bone.


For the railroad tracks, I built a master track section, and resin cast copies. These pieces were fit end-to-end across the board, and styrene T-beams were laid overtop for the rails.


There are more images of the table in the terrain gallery. Check 'em out! Next week, I'll show off the building interiors, and talk about their construction.


'Til next time!

Tuesday, January 8, 2013

Wild West Exodus Terrain

Outlaw Miniatures has been putting up some great previews of models and concept art on their website wildwestexodus.com and the Wild West Exodus Facebook page. They'll be launching a Kickstarter program on February 1st, 2013, so watch for it! Something wicked is coming...


Their game is called Wild West Exodus, and it's set in the American West in the 1800s. A strange discovery has resulted in a technological renaissance, and so the setting is a mix of western architecture and high tech devices. In the scenery, this is represented by the iron horse tethers, electric lights, neon signs, and cables running everywhere from the ubiquitous generators powered by glowing energy cells.


Now that the table is finished, it's time to show off all of my hard work. In the coming weeks, I'll talk about the buildings themselves, their interiors, and how I pulled off some of the details like the neon lights. But for now, I'll let the photos do the talking:


'Til next time!