WWW.SKULLFORGESCENICS.ETSY.COM

Saturday, August 30, 2014

He is Risen!

*Note:  I've edited this text as I've read more of the book, and to make the review of the rules a little more comprehensive.

I began playing Warhammer in 1997 on the tail end of the 5th Edition. Back then the undead army was a combination of vampires, necromancers, mummies, and all manner of units, in a single army book, simple titled Undead. Nagash was the lord of the undead, and the most powerful character in the army.


When my collection was still in its infancy, the army was fractured into the Vampire Counts and the Tomb Kings armies. Each was fleshed out with new units and characters, but Nagash was not among them. In the lore of the Warhammer world he'd been killed, and his absence from either of the new armies had us wondering if he'd ever return.


I never had the old Nagash model, and never used him in a game. His return is one of the things I've been looking forward to (perhaps dreading) for almost 15 years, so this is a pretty exciting time to be an undead player!


I had mentioned some time ago that the current Vampire Counts book feels closer to the original, 5th Edition Vampire Counts, with the way the army and characters are structured. And now we've come full circle, with the Vampires and Tomb Kings reunited in a single, massive army list under the most feared necromancer of all time.


An Overview of the Nagash Books


I took a quick look through the books. Book I is described as "the first chapter in the story of the End Times." I'm not sure how many books there will be, but together they will likely form the overall story, ushering in the 9th Edition of Warhammer. Since Nagash binds the Vampire Counts and Tomb Kings into a single army, this is likely where the rumor of "one big book for multiple, similarly-themed armies" originated. I imagine there will be a few more combined armies, maybe combined Chaos, Elves and Dwarfs, Bretonnia and Empire. Who knows?


The Undead Legions Army List


Book II contains the rules for fielding an Undead Legion army. It is essentially the combined list of both the Tomb Kings and Vampire Counts army books. It's worth noting that the unit entries are not in the Nagash book (aside from the new characters and Morghasts), so the current hardcover army books are still required. My theory (and I hope it proves to be true) is that the hardcover books will remain the army books for 9th Edition.


One thing I noticed is that not all of the special characters in the Vampire Counts army book are listed in the Undead Legions army list, and are therefore not available. Heinrich Kemmler is absent, as are Konrad and Isabella Von Carstein. So if you want to play with those characters, you'll need to field a "regular" Vampire Counts list. There's a new version of Krell, however, among the other Mortarchs like Vlad and Mannfred.


The full list of special characters available to the Undead Legions include the new character profiles in the Nagash book:


Nagash
Manfred von Carstein, Mortarch of Night
Vlad von Carstein, Mortarch of Shadow
Arkhan the Black, Mortarch of Sacrament
Neferata, Mortarch of Blood
Krell, Mortarch of Despair

And the existing special characters in the Tomb Kings book:

High Queen Khalida
Prince Apophas

It's worth noting that the Abyssal Terrors ridden by some of the characters are not counted as a character and a ridden monster. The entire model counts as a monstrous character with a single profile.

The only new units are the the Morghasts. Morghast Harbingers (equipped with two hand weapons) are fielded in units of 2+ models and count as a Special choice in the army. Morghast Archai (equipped with halberds) are fielded in units of 2+ models and count as a Rare choice in the army.

Nehekaran Undead are treated as regular Undead for all intents and purposes. And any spells or rules that affect one or the other apply to both; essentially there is no separation between "wet" or "dry" undead. (Worth mentioning because I've seen some concern about that online.)


The Undead Legions list also does away with the specific army rules for the Vampire Counts and Tomb Kings and reprints a combined list of army rules. It doesn't look like there is any difference for how the undead armies work. One new feature of the Undead Legion is that the army does not begin to crumble if its general is slain!


Every army has its allowance for Lord characters and Hero characters increased up to 50% for each.

The Lore of Undeath


The new Lore of Undeath is pretty solid. It's has rules for a new spell type: Summoning (spells that create new units) and four of the seven spells (6 spells plus a signature spell) allow the caster to summon any of the different categories of undead from anything in the army list. Any wizard in any army can use the Lore of Undeath, so we could see Empire wizards resurrecting Skeleton Chariots! (That's right, puppets, dance! Do our work for us!)


Unlike the other raise the dead spells, which replenished or added a certain number of models, the summoning spells allow you to summon new units up to a certain points total. Each spell has higher and lower levels of difficulty, allowing you to raise whatever you want, with any of its available options within the points value. (Even characters!)


The full list of spells is as follows:

Grave Call (Signature spell, summons infantry or monstrous infantry)
Breath of Darkness (a cross between Invocation of Nehek and Danse Macabre)
Hand of Dust (gives the wizard a single, deadly attack in hand to hand combat)
Soul Stealer (works like a Banshee's Ghostly Howl with a longer range)
The Abyssal Swarm (summons war beasts, swarms, or monstrous beasts)
The Harbinger (summons a character, monster, chariot, or war machine)
The Dark Riders (summons regular or monstrous cavalry, or chariots)

Something else worth noting is that the lore attribute gives the caster a token for each successfully cast spell. He can cash in these tokens later to increase the points value of units when summoning them.


Other Rules


The book also has rules for the characters Valten and Crom the Conquerer and a new set of special terrain rules for fighting underground and in haunted battlefields. It covers things like fighting in darkness, cave-ins, haunted terrain, and rules for haunted forests and the Garden of Morr that could be applied to any graveyard elements. In addition, there are 19 different scenarios that allow you to recreate the battles of the End Times.


The Nagash Model


This is a pretty sweet kit with tons of detail and two (technically four) build options. He can be built with his right hand holding a book or a spirit, and his left hand holding his sword or staff.

After seeing the initial pictures leaked online, I was trying to think of ways to convert the model and put my own unique spin on it. But now that I have it in hand I don't know what I'd do to "improve" it.


I'm certainly going to spice up the base.  The ethereal tendrils that hold him aloft appear to be sweeping through the bones littering the ground.  I think a graveyard scene or even a mausoleum is in order.  Hell, I might even create a swarm of skeletons being animated by his mere presence.  Whatever I do, I'll keep an assembly and painting blog on the progress.  I definitely can't let this model languish on the Shelf of Shame.


In anticipation of the Nagash release, I've been using all of my spare time to get through my backlog of projects for both Skaven and Vampire Counts. I've just about got the Terrorgheist's base finished. Time to finish up the monster itself. I imagine Marduk will be pretty pissed if Nagash brings him back to the living realm and his ride is still in the shop...


'Til next time!

Arcadia Quest Diorama, Part 5

For this final installment, I've got a few photos of the painting process and a selection of finished images. The terrain gallery has been updated to include the diorama. For the full gallery of images, click here.


Painting


All of the elements were painted separately, like the ground and flagstone streets, and the Hammer Fortress.


The University clock tower was sprayed with purple for its basic undercoat...


...and then it was drybrushed with a series of purple-greys.


Once the stonework was finished, all the details like the railings and telescope were added.


The Alchemy District was painted with a blue-green scheme to help differentiate it from the other areas of the diorama.


With everything finished, the lights get turned on...


...and here is the Arcadia Quest diorama in all its glory! 


You can see the full spread of detail shots, including the finished terrain before the miniatures were added, in terrain gallery here. And check out the game itself on the Arcadia Quest website.


'Til next time!

Wednesday, August 27, 2014

Arcadia Quest Diorama, Part 4

Now that the diorama has been premiered at Gencon, and Cool Mini Or Not has photos of the finished table up on the Arcadia Quest Facebook page, I can show off my process for the final construction of the moon and backdrop.


The Moon


Cool Mini wanted the diorama o have a backdrop with a moon and fiber optic stars behind the action. The moon also needed the Arcadia Quest logo emblazoned across it.


The backdrop stands just over four feet tall, and screws into the base of the diorama. In this shot, you can see the outline of where the moon will be, about two feet in diameter.


To construct the moon, I began with layers of insulation foam, stacked and sanded into a semicircle. The craters were burned in with a heat gun, and then I smoothed over everything with wood filler putty.


The wood filler creates a unique texture, and to enhance the rough surface of the moon, I coated everything with wood glue and a little sand.


Cracks running from the craters were cut into the surface, and then I sprayed everything with black primer.


After the primer, a dusting of grey sprays I began painting the moon with a series of drybrushes and washes using a variety of blues, greys, and black ink. The logo, printed and mounted on foam core, was bent around the curve of the moon. 


The logo was separated into two layers– the background elements and the text. The background was secured to the moon and the edges painted to match the surface.


The text was mounted over top, to create a tiered logo.


The backdrop was sprayed with blues and purples, and speckled with a star field. The fiber optic lights were positioned, linked to the lighting in the Alchemy District, and then the moon was attached.


I'll be updating the terrain gallery with images of the full, finished diorama later this week.


'Til next time!

Thursday, August 14, 2014

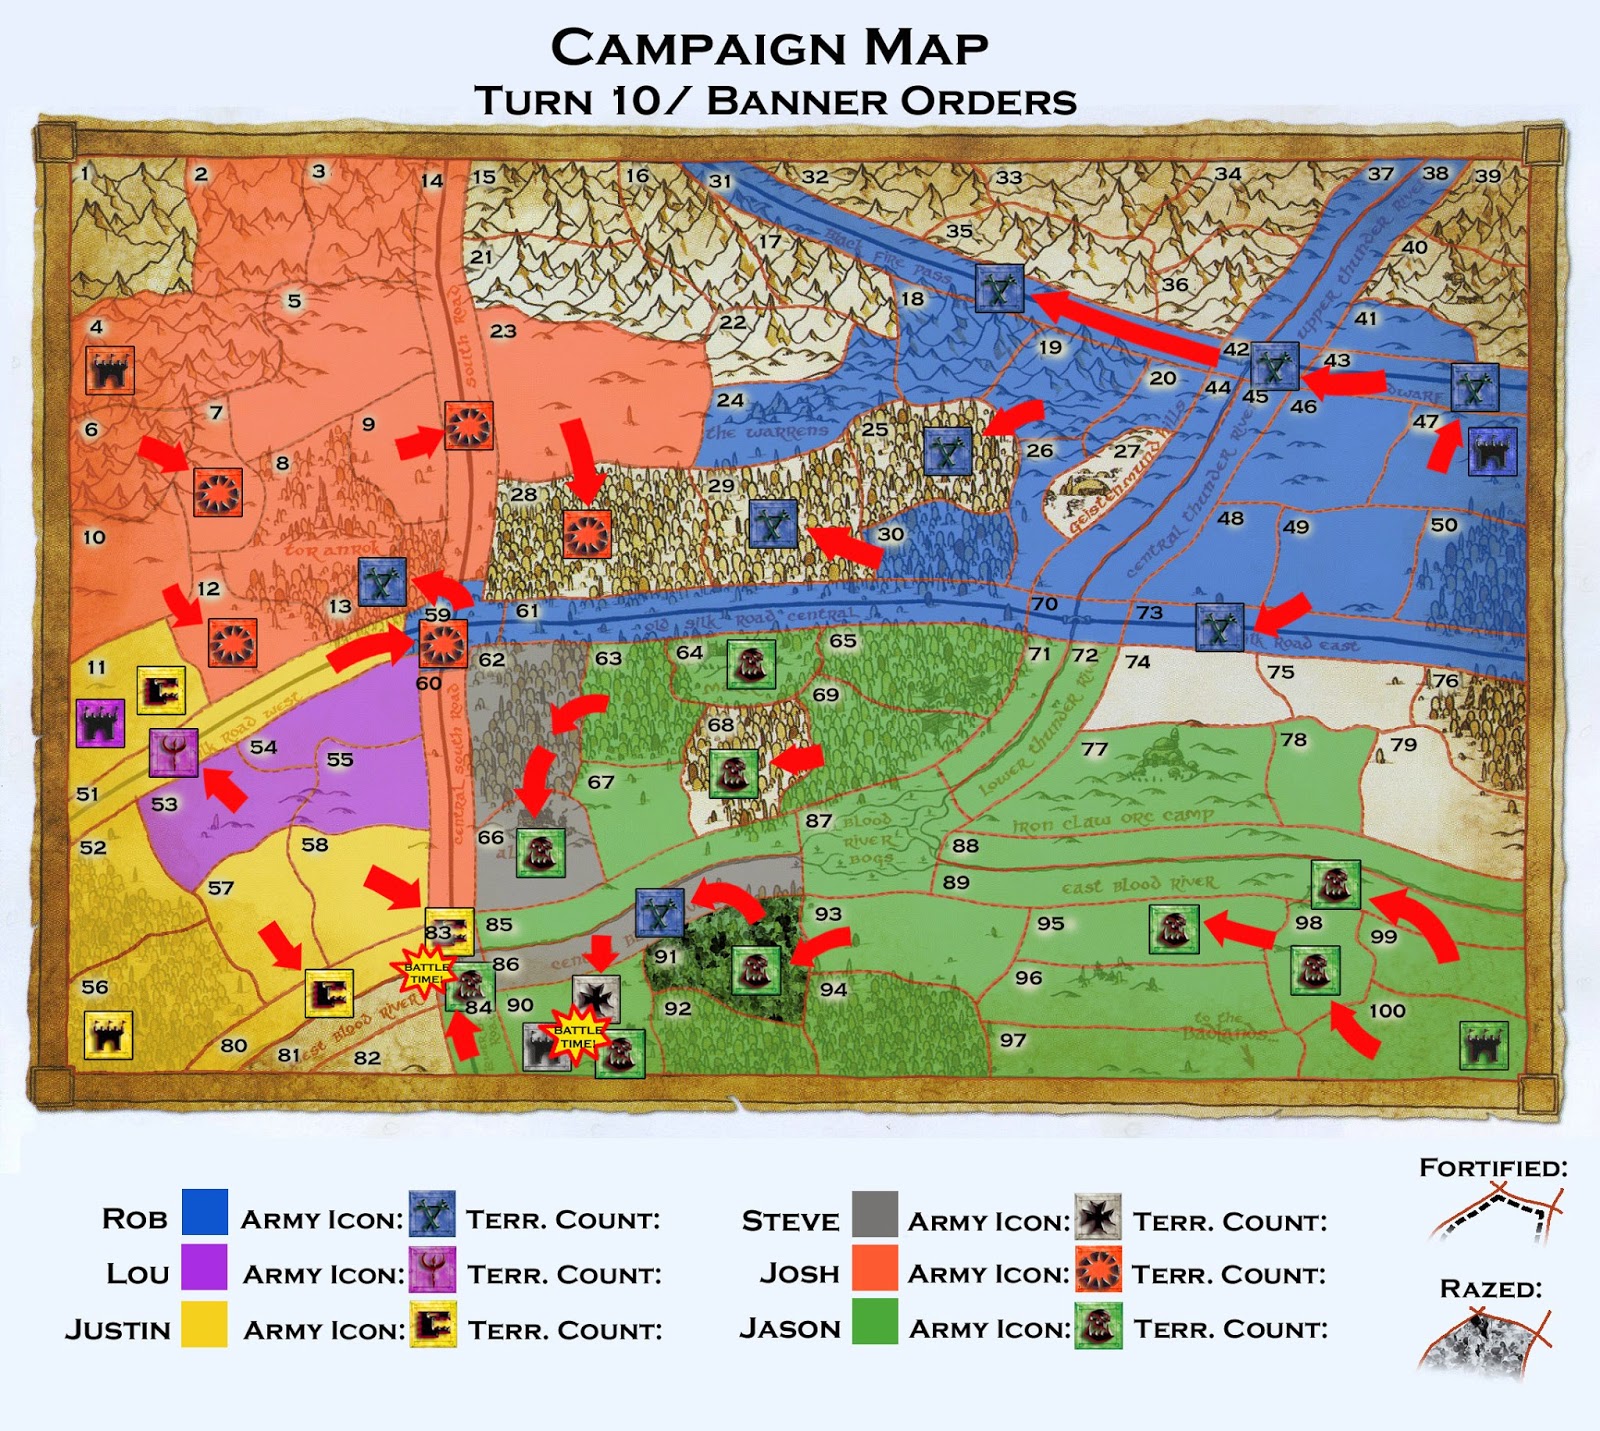
Campaign Update: Casualties and Treachery

Our Players


Justin Cunnane: Chixl's Warhost (Lizardmen)

Jason Pierson: Waaagh Blackfang (Orcs & Goblins)

Louis Mule: The Murderous Legion (Dark Elves) 

Josh Affrime: The Horde of the Scorched Cauldron (Ogre Kingdoms)

Steve Stiefel: The Roving Province of Sigmarheim (Empire)

Rob Hawkins: Skryre Lord Skreekits' Lightning Engineer Cult (Skaven)


The campaign was put on hiatus for a while due to illnesses, work, and life in general. But now we're back up and running. Turns 10 and 11 occurred some time ago, and I've been waiting for turn 11 to resolve before posting an update.


When we left off, The walled city of Malko had been secured by the orcs of Waaagh Blackfang. The Roving Provence of Sigmarheim was cast out of their fortress at the hands of the green tide. The Dark Elves' Murderous Legion were racing back to their headquarters to liberate it from the clutches of Chixl's Warhost. The Horde of the Scorched Cauldron and Skryre Lord Skreekits' Lightning Engineer Cult were tangling in the northern territories. 


For complete coverage on the previous turns, click the Campaign label in the sidebar, or just click here.


Turn 10: The First Casualty


As everyone's orders were submitted and the army banners maneuvered on the map, we saw the Skaven moving to claim more territory in the north. The Skaven banner in the south had surfaced last turn, and now moved in to help the Orcs surround the Empire's headquarters. Since the Skaven Lightning Engineer Cult were allied with the Murderous Legion, the the Skaven banner on the western road sidestepped an Ogre banner on their march to assist the Dark Elves in the recapture of their headquarters. 


In the South, the remaining banner from the Roving Province of Sigmarheim assaulted its headquarters territory. The Orcs had a 400 point advantage in the battle, and Steve's army was massacred. With no headquarters to reform in, the Empire was eliminated from the campaign. Steve opted to keep his banner in play, retreating two territories. The Empire banner could no longer capture territories, or ally with other armies.


Justin's Lizardmen had moved in to try and assist Steve, but they met their own resistance from Jason's Orcs and were also massacred.


Turn 11: Treachery!


The underhanded Skaven struck a bargain with the Horde of the Scorched Cauldron. Betraying their alliance with Waaagh Blackfang, the Lightning Engineer Cult drove southward, invading the Orc lands. The Skaven banner on the river even Razed the territory, meaning the Orcs would need to take time to Recover the lands before it could again be counted toward their overall territory.

My Skaven banner, surrounded by Orcs, was outnumbered by 400 points. Even with those odds, I still managed to squeak out a draw. The key turning point of the battle was when I broke Jay's 50-man unit of Ork Boyz. It was a close fight but, in the end, the draw forced us to both retreat from the territory. My banner, with no friendly territory, was Scattered and reformed back in its headquarters.


The Murderous Legion was unable to recapture its headquarters, and Lou's Dark Elves bowed out of the campaign. The Orcs and Ogres had a minor engagement near the road, which drove off the Ogre banner.


So, at the end of the 11th turn, two armies have been eliminated. As the remaining four players move into turn 12, we will see how the alliances hold up. The Lightning Engineer Cult and Horde of the Scorched Cauldron have an alliance to push southward and overtake the territory of Waaag Blackfang, but the Ogre Kingdoms also have a pact with the Chixl's Warhost. At the same time, the Orcs and Lizardmen also share an alliance. If the Lizardmen are to break out of their corner, they may need to betray someone. Unless they are betrayed first!


'Til next time!

Monday, August 11, 2014

Warlord Skabsis and His Fell Blade

I got to play my first game in months. My buddy Steve and I decided on 4000 points, Skaven vs. Empire. At that size, a Steam Tank was inevitable, and I needed to make sure I had something to deal with it.


Jezzails have a 50% chance of wounding it but they're notoriously inaccurate and, even though I have 30 of them, getting them all aligned against a single target can prove difficult on a board with dense terrain.


The Warp Lightning Cannons and Doom Wheels can potentially throw out Strength 10 shots that inflict multiple wounds. But they have just as much chance to fire at Strength 2 or misfire and explode.


Enter: The Fell Blade. This magic sword makes the wielder strike at Strength 10, which is strong enough to allow no armor save, and each wound inflicted multiplies into D6 wounds. I didn't want my general going anywhere near a Steam Tank so, the night before the battle, I painted the Spinetail miniature. He's the first model out of my Skaven project queue: The Clan Pestilens Warlord Skabsis.


The battle was fought at Steve's house, on his Empire-themed battlefield. His army, The Roving Province of Sigmarheim squared off against the Lightning Engineer Cult. (This battle is outside the campaign we're involved in, which is still underway. I'll have an update in the near future.) I wasn't about to do a full, in-depth battle report. The time required to document everything turn-by-turn is just too much and Steve and I just wanted to get together, push models around and throw some dice. Here are some highlights from our game:

We fought a standard pitched battle. His Steam Tank was on my right flank (at the far end of the table in this shot) and his battery of artillery was on my left (at the closer end of the table). I made sure to deploy Lord Skabsis in a unit of Clanrats opposite the Steam Tank. So far, my plan was working perfectly.


Steve took the first turn, moved his battle line forward, and began measuring for his spells and shooting.


Here is Steve's Grey Wizard, moments before a miscast sent him screaming into the realm of Chaos. (I told him to say 'hi' to Marduk for me.)


His cannon fire eliminated one of my Doom Wheels before I even had a chance to move it. I brought my forces forward, in an effort to get the Rat Ogres into combat before they could absorb too many cannonballs.


Steve obliged me by charging with his knights and Free Company. Skweel Gnawtooth didn't survive the first round of combat, but the Ogres themselves held.


Over on the right flank, the Steam Tank was engaged with my rat swarms. I didn't have room to fit Warlord Skabsis in the fight, so I needed to wait before charging him in. Steve's Death Wizard cast Purple Sun of Xereus, which ripped through my rat swarms. The spell dissipated once my assassin, hidden behind the building, put a few Warp Stone Throwing Stars in the wizard's back.


The battle with the Rat Ogres was grinding away at them, and once Steve's Greatswords joined the fight it looked like I'd lost. But the Rat Ogres, with the aid of Warlord Skreekits' inspiring presence and the army's battle flag, continued to hold their ground.


Once the rat swarms were finished, I had my opportunity– Skabsis charged out of his unit and swung the fell blade at the Steam Tank. He landed two hits which multiplied into 11 wounds! The vehicle exploded spectacularly... and Skabsis was promptly shot to pieces by Steve's Handgunners. A weapon that powerful doesn't leave any room for magical armor or protective talismans. It was worth it for the look on Steve's face when the warlord cut his tank in half, even though Skabsis didn't survive the battle. I'm sure the Master Moulders can piece him back together.


At about this time, my Doom Wheel had gotten close enough to start zapping Steve's artillery. I took out his cannon and Helblaster and (because the Doom Wheel's warp lightning doesn't distinguish between friend and foe) one of my own Warlock Engineers in the process!


I brought a unit of Clanrats in to help the The Rat Ogres, but the combat was lost anyway. The remaining Ogres and Clanrats broke.


My Stormvermin, led by Warlord Skreekits received the knights' charge, and managed to drive them off.


I had broken through Steve's line, but suffered some serious casualties in the process. The game had gone so long and we still had the dreaded cleanup ahead of us, so we didn't bother counting up victory points. We were content to call it a draw.


My plan with the Fell Blade worked beautifully. I just need to figure out a way to keep Skabsis alive once he's delivered his killing blow. And maybe I'll have the Hell Pit Abomination finished for the next game.


'Til next time!