Throughout the year I've been working on a series of articles for No Quarter Magazine, focusing on faction-themed conversions for Mercenary and Minions models. Here are a few from the previous issues:
Skorne Gatormen
Enslaved by a paingiver taskmaster, these gators have been outfitted with ornate armor and weaponry. This unit was based on the new plastic gatorman kit with Skorne Praetorian Praetor shoulder pads for their knee pads and Cataphract Arcuarii shoulder pads. The halberd heads are from Tyrant Rhadeim's weapon. You can see a full tutorial for how I converted these in No Quarter Magazine #54.
Circle Orboros Slaughterhousers
These Farrow Slaughterhousers appeared in No Quarter #55. These conversions were mainly weapon swaps using halberds from the Warpborne Skinwalkers and Druids of Orboros. Some bones from the Gallows Grove trees made appropriate trophies, and the lightning pattern on some of the shoulder pads was sculpted with modeling putty.
No Quarter #57 hit the shelves recently, and this one focuses on the mage hunter Eiryss working undercover with various factions:
Protectorate Eiryss
Disguised, Eiryss can walk unnoticed among Menite priests or Daughters of the Flame. I envisioned this conversion as Eiryss wearing robes over her standard equipment. (The old assassin in a nun's habit trick works every time!) An arm swap and head swap with parts from Daughters of the Flame units gives her some Protectorate flair.
Parts List:
Eiryss, Mage Hunter of Ios
Daughter of the Flame # 2 and 3 left arm
Daughter of the Flame Leader's right arm
Flame Bringer hood and poncho
Cygnaran Eiryss
The Angel of Retribution being perched atop the wreckage of Cygnar symbolizes the duplicity of her actions. She may be working for the humans now, but their world will burn soon enough. Lieutenant Allison Jakes' arms are used to add some Cygnaran iconography and armor to her pose, and after cutting away her base, Eiryss was mounted on Supreme Kommandant Irusk's epic base.
Parts List:
Eiryss, Angel of Retribution
Epic Irusk's base
Lieutenant Allison Jakes (just for the arms; save her body for something else)
Khadoran Eiryss
The final version of Eiryss uses the No Quarter exclusive model. It's the simplest conversion, with modeling putty used to add fur trim to her cloak. The base is also sculpted with snow to reflect the frigid environment of Khador. I did a short tutorial on the snow base technique a couple years ago. You can check it out here: Modeling and Painting Khador.
Parts List:
Eiryss, Mage Hunter of Ios, NQ Variant
I hope everyone has a happy and safe Thanksgiving!
'Til next time!
I picked up the Tomb Kings book today. I've had a few ideas kicking around in my head for how to incorporate some of their units into my Vampire Counts army. This got me thinking back to my early days in Warhammer, when the Undead had only just split into Vampire Counts and Tomb Kings. This was around the same time Warmaster was released and, of course, I went with the Undead army.
While my Warhammer Vampire Counts army was slowly evolving into the Legion of the Infernal Skull, and there wasn't yet a Tomb Kings army book, my Warmaster force was filling that roll. I enjoyed Warmaster so much (and still think it's one of the best table top games out there) it became my main focus in the hobby.
I finally got around to taking some photos of the miniatures, so here is the Army of the Baltizzar Necropolis in all it's glory!
Tomb King Ptahkhan-Hur leads the army. The general can be upgraded with a chariot, so I converted a four-horse chariot to carry him into battle. The totem behind him marks his ability to bolster his troops with extra attacks once per game.
Settisis is the liche priest leading the Serpent Brigade. The smaller banners for the archer units and and Settisis' staff were converted with icons to match the skeleton infantry units.
At the head of Skull Brigade is the liche priest Axiris. Axiris is infamous for failing his command checks when issuing orders to the units under his charge.
Selketta commands Scorpion Brigade, which is mainly comprised of archers and cavalry that operate on the flanks of the main army.
The zombie dragon is ridden by the liche priest Imnutep. I use him to command the carrion birds and add a little extra punch at the front lines.
Painting monsters like the Sphinx and Bone Giant are a nice change from drybrushing tiny skeletons. Their abilities in combat shouldn't be underestimated, either.
My war machines are on oversized bases, with extra details like the bone-thrower bolts, cut from Warhammer-scale arrows. When cutting the bases, I made sure the amount of stands that could contact base-to-base would not be affected.
Warmaster is a great game that doesn't get played nearly enough, and I'm always up for a game.
'Til next time!
I recently played a game with my new Skaven models. The Hell Pit Abomination and Screaming Bell performed pretty well and even survived the battle, securing me the victory. One of the things I discovered during the game is that moving around a horde of Stormvermin with a Screaming Bell is a pain without a properly-sized movement tray.
I've been playing Warhammer for years, and use the older style of GW movenent tray. You can't get them anymore (they really aren't large enough enough for a 10 x 6 man unit anyway) and I don't care for the grid on the surface of the newer trays. So, I'll need to scratch build new trays to match my older ones. This is the opportunity to put together a tutorial for making movement trays!
The old GW trays are as unobtrusive as possible, only adding about 1/8 inch to the edge of the unit. (One of my pet peeves is when people make movement trays with borders that are 1/4 inch or thicker.)
To match that sizing, I use .060" (1.5mm) thick sheet styrene and .080 x 1.88" (2.0 x 4.8mm) styrene strips.
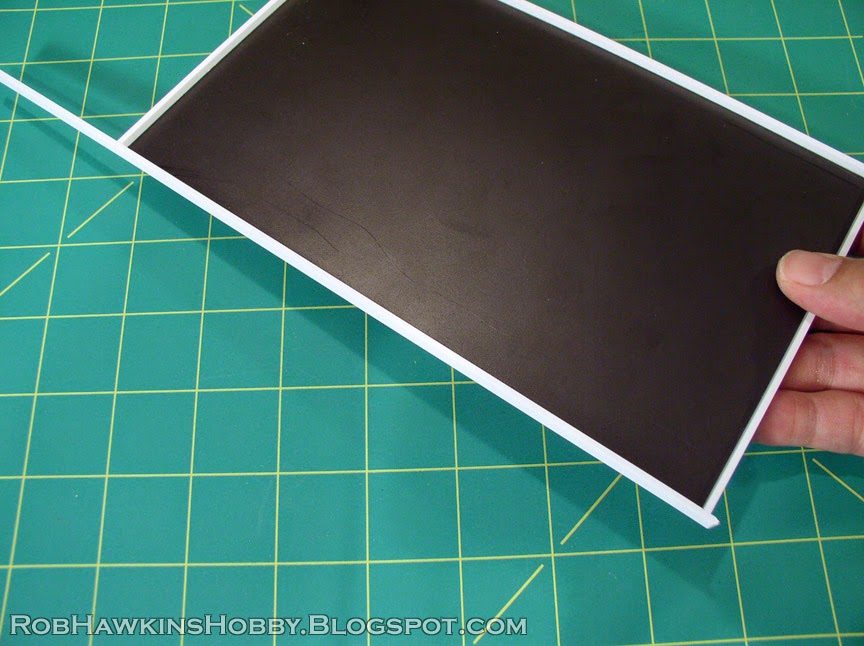
First, estimate the width you'll need for the card. This sheet is almost perfect for the frontage of this unit; only a little will need to be trimmed off of the side in the later steps.
Super glue (you could also use plastic cement, since this is styrene plastic) a rail to the front edge of the card. Glue it to the outer edge, flush with the bottom (not on top of the card). Leave a little overhanging the corners.
Now, place the entire unit in the tray to measure the rest of the fit. I prefer to use the physical models rather than measurements because there are always imperfections that wind up making the tray too tight or too loose. Be sure the glue on the rail is completely dry so you don't get any on the miniatures' bases. Square up the unit against the front rail and flush with one edge. Then mark and trim the excess on the opposite side. Don't make it exact; be sure to leave a little wiggle room.
Mark the back edge of the unit (plus a little wiggle room) and then cut the card using a straight edge.
Glue the side rails onto the card. They should but up against the overhanging rail on the front.
Trim the overhanging excess with a hobby knife.
Trim the excess at the back, as well.
Then, glue the final rail on the back of the card.
Trim the excess and it's nearly complete. If you don't mind the square edges and don't texture your movement trays, you could call it done and move on to painting. Otherwise, I'll show you how to bevel the edges and texture the tray.
To bevel the edge, use a heavy grit sandpaper (220 is about right). Hang the tray over the edge of the table and sand away. Only sand the outside and keep the inner edge square. Keep the sanding under control so you don't scratch up the bed of the tray.
The result is a beveled edge that tapers a little narrower at the top. The outside also has a nice "tooth" that will allow the glue and sand to adhere a little better.
At this stage, I make one final check to be sure the unit fits. The sides are near perfect and there's about 3/32-inch gap at the back, which is fine, and will allow for the odd model that doesn't rank tightly with the one in front of him, pushing things back just a hair.
Texture the edge with sand or ballast. I use super glue to ensure the ballast doesn't come off and so that it dries immediately. Waterproof wood glue would be fine, but you'll need to allow more drying time and take care that the sand doesn't get knocked off. When working with the super glue, take care not to let any seep inside the tray, or you'll wind up with sand gumming up the corners.
Once the sand is in place and the glue dry, scrape the bottom edge with your knife to remove any sandy burs that would snag on the table when pushing your unit across the battlefield.
That's it! All that remains is the painting.
Prime the tray and spray it with a base color. (I use Model Masters Medium Green on my Skaven and Vampire Counts trays so it matches my base edges. As casualties are removed, the exposed green surface also blends into the battlefield a little more.)
Paint the sand and add static grass or flock to match your army's basing scheme, and the tray is finished!
Now the Screaming Bell has a tray large enough to hold the unit pushing it into battle. The tray can also be used to hold any 20mm-based unit in the 10-wide horde formation.
'Til next time!
As I've been toying around with the Nagash model I've noticed a few things that address some of the complaints people have had about the model. It's going to be some time before I finish this guy, so I'll put these up here for anyone who is interested:
Some people don't care for the "Doc Ock" bone spines on Nagash's back. Personally, I have no problem with them, so they'll be on my final model.
But if you don't like them, Nagash's back is fully detailed underneath the bony plate with the spines, so the tentacle part can be left off with exactly no work.
The part even has a neat, spidery appearance, so a savvy hobbyist might find use for it as part of a Tomb Scorpion conversion or (with a few added tech bits) some sort of Necron contraption.
People have said Nagash's head is too small. With the model in hand, his head does look a little small. It's not as noticeable with all of his parts in place, but if you imagine it without the hat, Nagash's skull is out of scale with his rib cage.
I have a Bone Giant head that looks more appropriately sized. I'll have to resculpt the jaw and teeth to make it look more like a human skull, essentially keeping the top of the skull and the orbital sockets and redoing everything below the nasal cavity.
Unfortunately, the hat looks like it will be too small for the new head. I'll need to figure out a way to widen it at the base without losing too much of its thick-to-thin taper. I may also need to rebuild the ornamentation over the brow so it properly frames the eyes.
I guess we'll see how it all plays out.
'Til next time!