As I was wrapping up my year-long project to convert all the Space Hulk Terminators from Blood Angels into Black Templars, I decided to document my painting process. I've been collecting space marines since about the year 2000, and while the names of the colors have changed over the ages, my process has remained pretty much the same. Here's a tutorial you can follow for painting quick and easy Black Templars:
Colors Used
GW Colors:
The Fang (aka Fang Grey)
XV-88
Screaming Skull
Hashut Copper
Auric Armor Gold
Formula P3 Colors:
Thamar Black
Rucksack Tan
Moldy Ochre
Menoth White Highlight
Morrow White
Sanguine Base
Skorne Red
Khador Red Base
Cygnus Yellow
Pig Iron
Cold Steel
Quick Silver
Other Paints:
Secret Weapon Soft Body Black Wash
Koh-I-Noor Black India Ink
Liquitex Transparent Burnt Umber Ink (aka Brown Ink)
Testors Dull Cote
Start by spraying the model with black primer. Next, mix Thamar Black with Fang Grey and drybrush the entire model. The intention is to keep the mix very dark, but bring out the highlights in the model. Finally, mix a little more Fang Grey into the black and paint highlight lines along all the sharp edges. The mix should never get bright enough that it's straight Fang Grey; the intention is to create a black model with subtle highlights, rather than a grey model.


Once the black armor is finished, basecoat all of the areas to be white, bone, or parchment, with XV-88. Try to keep it clean, but don't sweat any minor brush strokes into the black area; those can be touched up later. The XV-88 brown creates a nice under layer so you aren't painting the brighter colors over straight black. When building up these colors, make sure each layer dries thoroughly so you don't pull up the paint when applying the next layer.


Basecoat the parchment with Rucksack Tan, and the skulls, crosses, wings, and shoulder pads with Screaming Skull.


Build up some highlights on the parchment with Moldy Ochre, and Moldy Ochre with a little Screaming Skull mixed in for the brightest highlights.

Basecoat the white areas (shoulder pads, wings, and crosses, but not the skulls and Crux Terminatus) with Menoth White Highlight.

Then, wash the skulls, parchment, wings, and crux with a mix of Brown Ink and XV-88. Be very careful to keep the wash controlled so it doesn't run onto the brighter white areas.


Bring the highlights back up on the parchment with Moldy Ochre and hit the edges with a little Moldy Ochre and Screaming Skull. Use a fine brush to carefully paint some Brown Ink into the recesses and folds of the parchment and add a slightly darker glaze if the highlight color gets too bright.

Highlight the bones and wings with Screaming Skull and a mix of Menoth White highlight. The bones and crux should stay "bone colored," so do not take their highlights up to straight Menoth White Highlight. But the wings should be highlighted up to straight Menoth White Highlight. You can also touch up any messy parts on the shoulder pads. As with the parchment, use a fine brush and straight Brown ink to paint in the lines on the crux and between the feathers of the wings.

Finally, highlight the bright white areas with Morrow White– The wings, shoulder pads, and Templar crosses.

Once you are satisfied with the white and parchment areas, use Thamar Black to touch up any spots where the color ran into the black armor. Carefully paint the black cross on the shoulder pad, and add some highlights with a mix of Fang Grey and black. Paint the cables with straight Fang Grey.

For the writing and litanies on the armor, use a fine brush and straight Morrow White, thinned with a little water so it flows smoothly. Simulate writing by painting a series of squiggles, dots and dashes. For the writing on the purity seals, the name, and the black writing on the shoulder pads, use India Ink. I recommend India Ink because it's more opaque than a black ink or wash, and will stay fluid in your brush much longer than black paint. If you find it too black, you can cut it with some Brown Ink. It should be noted that the India Ink dries shiny, but that can be taken care of by spraying the model with a matte finish.


Next, move on to the red bits. For the red lenses in the eyes, paint the eye with a 50/50 mix of Sanguine Base and Skorne Red. Then paint the bottom half of the lens with Khador Red Base. Add a highlight spot of Morrow White at the top of each eye. Finally, clean up the shape of the eye by painting black around the edge and touch up the grey highlight if necessary.

Paint the wax purity seals and red cables by basecoating them with Sanguine Base and layering highlights with Skorne Red and Khador Red Base. Paint the two lights in the back using a spot of Khador Red Base and a spot of Cygnus Yellow.


Next, spray the model with Testors Dull Cote to flatten out the color and eliminate any shine from the inks. Then move on to painting the metals; this will allow the model to have a flat, matte color while the metals maintain their metallic sheen. Paint the gold details with Hashut Copper, highlight them with Auric Armor Gold, and then wash them with Brown Ink.

Basecoat the other metal details (including the small rings where the cables attach) with Cold Steel. Basecoat the metal parts of the storm bolter with a mix of Pig Iron and Thamar Black to keep the weapon a dark gunmetal.

Wash the Cold Steel areas and the grey cables with Soft Body Black Wash. Once it is dry, drybrush the thick hoses on the arm with a little Cold Steel, and use a small drybrush to carefully drybrush some highlights on the gunmetal with Pig Iron. If there are any sword or knife blades, highlight them using Cold Steel and Quick Silver for the edges.

Paint some Soft Body Black Wash into the areas between the armor where the segmented joints are visible to create a differentiation between the flat armor plates and the shiny rubber under-suit. (Note that a GW washes like Nuln Oil won't work for this technique because they dry matte rather than shiny.)

For the sensor lenses above the head, paint the lens and ring with Cold Steel and wash it with Soft Body Black Wash. Then, paint the lens using the same process used on the eyes. Just put a red dot in the lower, tiny lens. Do this for any gems on the icons and pendants, as well.

With the model finished, you can base it to match your army aesthetic, and he's ready for the tabletop!


'Til next time!
The last of the Terminators are finished! This has been a year-long journey, and the end is in sight; only the Space Hulk Librarian remains.
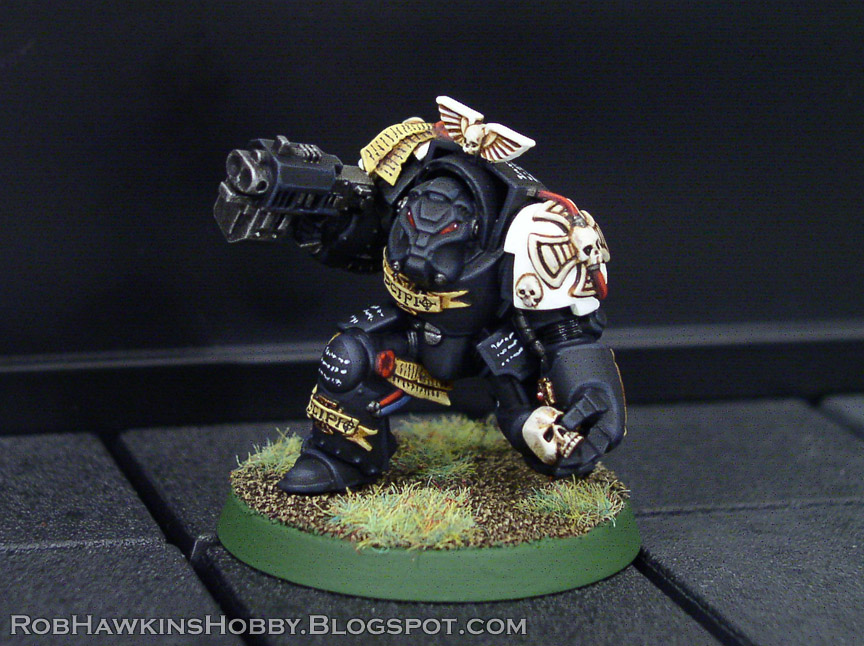
Brother Scipio
I feel like I've been saying this about every Terminator, but this guy required the most work to clean up his legs. Scipio is the marine who is kneeling and (for some reason) tearing up the floor. Since I've been removing all of the models from their plastic stands and putting them on traditional round bases, Scipio's floor bit had to go. That meant a major reworking of his hand and foot.

The entire toe was resculpted and the purity seal was widened to cover the irregularity on the back of his leg.

The underside of the shin grieve was easy enough to smooth out, but the fingers on his power fist needed to be completely redone. Rather than sculpt them, I cut the fingers from another Terminator and glued them in place with a little putty work to cover the join. I wasn't sure what to do with the hand, and at the last minute added a skull (it was just the perfect fit) as though he was collecting a trophy or perhaps the remains of a fallen comrade.


On the shoulder, I managed to salvage the existing skull, and then sculpted the cross around it. Surprisingly, Scipio didn't have very many blood drops that needed to be removed, so he required the least amount of "touch-up" sculpting.


Sergeant Gideon
Both of the sergeants had Blood Angel banner icons that I replaced with icons from the Black Templar upgrade sprue.

The storm shield proved to be a challenging resculpt. I needed to remove the skeleton and wings, but I wanted to keep the banner running around the edge. It was a four-step process: First, I sliced and scraped away the plastic details. Next, I used putty to smooth the surface of the shield. Then, I sculpted the cross. Finally, I sculpted the parts of the banner that go over top of the cross. The small skull below the cross is the head of the original skeleton that I carefully sliced away and then glued in place on the finished piece.


I think Gideon had the most pendants that needed to be replaced. In this photos, you can see which ones have been replaced, either with plastic Templar and Terminator parts, or sculpted over with putty.


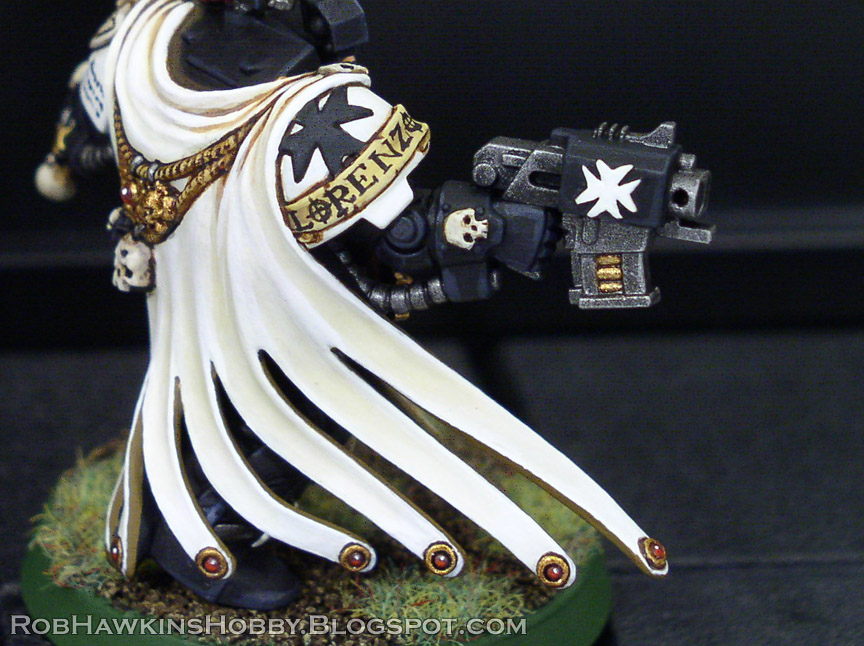
Sergeant Lorenzo
I was dreading this model the most, but once I looked at him, there really wasn't that much work to do. I think the cape makes him look more complicated than he is.


He only had one pendant that needed to be replaced, and actually had two Templar cross icons on him already. Other than a few small skulls, the challenging sculpting went into replacing the Blood Angel icons on his leg grieves with Templar half-crosses.

The blood drops on the cape were sliced away and replaced with a circle of putty, into which I pressed a small tube to create an inner circle. They were painted like gemstones with a gold mounting ring. By this time, sculpting a cross and banner on his shoulder was old hat. The model needed to be primed in parts so I could ensure coverage in the recesses under his cape. He was then assembled and the join in the cape puttied and primed again. His chest plate was left separate for painting.


With these three, the Templar Terminator conversions are complete! They all fit perfectly on a display stand in my cabinet. I have been adding each one as I finished him, and seeing the dais gradually fill up with the Terminators has been like watching America's Next Top Model, except in reverse. And with less bulimia.


The spot in the middle is reserved for the Space Hulk Librarian. He wont be a Black Templar, though, for obvious reasons.

Coming up, I'll have a tutorial on the process I use to paint my Templars.
'Til next time!